The Arena:
|
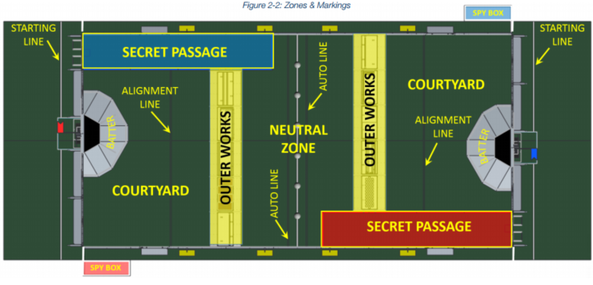
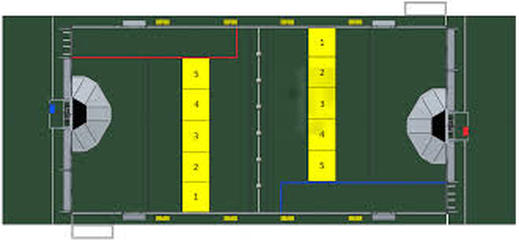
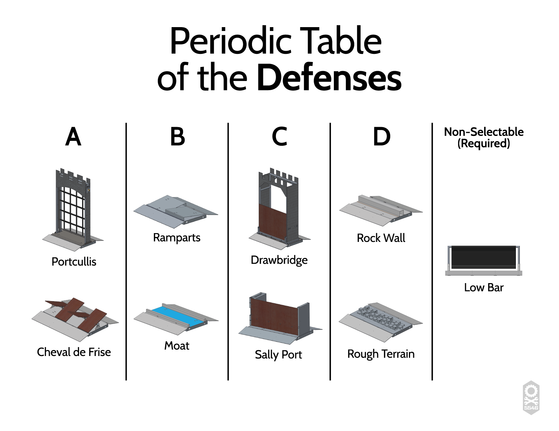
Outer WorksThe Field has five spaces in the Outer Works for Defenses. The Defense in position 1 is always the Low Bar. The Defense in position 3 is selected by the audience for each match. The other three Defenses are selected by each Alliance.
The Defenses in positions 2-5 are selected from four Categories (A-D as you can see to the left). In each set of Outer Works, there is only one Defense from each of these Categories. This means an Alliance can choose to use both the Ramparts and the Portcullis, but not both the Ramparts and the Moat.
Category A consists of the Portcullis and the Cheval de Frise. The Portcullis requires a Robot to lift the 5 pound gate and go under. It also has the added feature of blocking the line of sight. The Cheval de Frise is a set of alternating see-saws that a Robot has to line up to go over. Here, a Robot has to be careful to not get their undercarriage caught.
Category B includes two slightly easier obstacles: the Ramparts and the Moat. For both of these, the Robot just needs big enough wheels and good enough suspension to go over. With the Moat, be careful not to get stuck between the walls.
|
|
Category C has the Drawbridge and the Sally Port. Both of these open out towards the Robot; each provide their own challenges. The Drawbridge the Robot must grab from the top and pull down before it can go through. Like with the Cheval de Frise, be careful the undercarriage doesn't get caught. The Sally Port swings open clockwise and seems very complicated to get through. my team decided it would be easier to get help from an Alliance member on this one.
|
Category D contains the Rock Wall and the Rough Terrain. These two are fairly simple as long as the Robot has big enough wheels. The Rock Wall is pretty tall so the Robot needs wheels at least twice as tall. And for both of these Defenses, a running start seems to make it much easier to go over.
|
